

Table of Contents
- Why Your Display Method Matters as Much as the Art
- Gallery Wall Layout Ideas That Actually Look Intentional
- How High to Hang Wall Art (The 57-Inch Rule and Beyond)
- How to Hang Art Without Frames: Clips, Tape, and Leaning
- Framing and Matting: When a Frame Is Worth It
- Shelf, Bookcase, and Layered Displays for a Relaxed Look
- Choosing a Display Method by Budget and Permanence
- Protecting Your Prints: Light, Humidity, and Rotation
- Frequently Asked Questions
Last Updated: October 9, 2026
Why Your Display Method Matters as Much as the Art
The best ways to display art prints come down to three variables: the wall you have, the look you want, and how much damage you're willing to risk.
At MobiusLDG, we print on museum-grade 175gsm archival paper with pigmented inks, so the print itself is built to last.
Display is a preservation decision, not just a decorating one: direct sun, humid bathrooms, and cheap cardboard backing will fade or warp a print faster than any handling mistake.
Gallery Wall Layout Ideas That Actually Look Intentional
A gallery wall works when the spacing is consistent and the arrangement has a logic, even a loose one. The most common mistake is hanging pieces at random heights with uneven gaps, which reads as clutter instead of a curated collection.
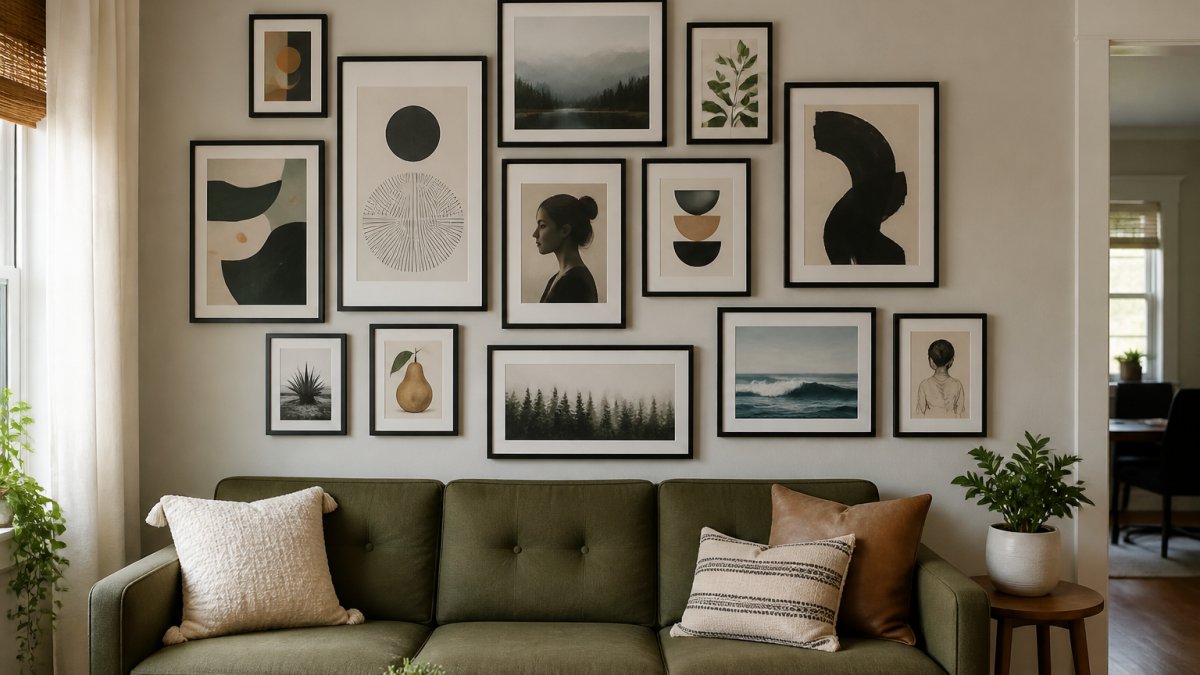
Grid, Salon, and Organic Arrangements
A grid layout uses same-size prints in even rows and columns. It suits a hallway or a narrow wall where symmetry does the work. A salon layout mixes sizes and fills the wall edge to edge, which is the classic approach for a large blank space. An organic arrangement follows a loose center and lets pieces drift outward, best for stairwells and awkward corners.
Measuring Your Layout Before You Commit
Lay your prints on the floor first and photograph the arrangement. Trace each frame onto kraft paper, tape the paper to the wall, and live with it for a day. This costs nothing and prevents a wall full of unnecessary holes.
How High to Hang Wall Art (The 57-Inch Rule and Beyond)
The standard hanging height is 57 inches on center, measured from the floor to the middle of the artwork, the average human eye level, which is why galleries and museums use it as a default.
Room-by-Room Height Adjustments
The 57-inch rule is a starting point, not a law. In a dining room, drop the center to around 54 inches for a seated guest's sightline. Over a sofa, leave 6 to 10 inches between the furniture and the frame. In a hallway, hang slightly higher so pieces read from a distance.
| Room | Center Height | Why |
|---|---|---|
| Living room | 57 inches | Standing eye level |
| Dining room | 54 inches | Seated sightline |
| Hallway | 60-63 inches | Viewed from a distance |
| Above sofa | 6-10 inches above furniture | Anchors the seating area |
How to Hang Art Without Frames: Clips, Tape, and Leaning
You can display art prints without a frame using poster clips, washi tape, or a simple lean against a wall or shelf. Each has a different risk profile, depending on your wall surface and how long the piece stays up.
Wall-Safe Methods for Renters and Delicate Surfaces
Renters and anyone with plaster or painted walls should avoid standard nails. Damage-free adhesive strips hold light prints but can pull paint if removed carelessly. Poster clips grip the top edge and leave the paper untouched, safest for a print you want to keep crisp. Washi tape suits a temporary look, but the adhesive can leave residue on matte paper over time.
For a heavier, ready-to-hang option, our Hummingbird Canvas Gallery Wraps arrive with hanging hardware and a closed MDF backing, so there's no framing step at all.

Framing and Matting: When a Frame Is Worth It
A frame is worth the cost when you want a print to read as a finished piece, protect the edges from curling, or match a room. For a print you'll keep for years, framing is the safer long-term choice; for a $13 poster you'll swap out in a season, it usually isn't.
The Parts of a Frame, and What Each One Does
The mat is the board border between the print and the frame.
The glazing is the glass or acrylic in front. Standard clear glass is cheapest and offers no UV protection.
The backing sits behind the print. Foam core adds rigidity and stops buckling.
The mount is how the print attaches to the backing. Archival linen tape or Japanese paper hinges are the standard for anything you care about.
Mat Width, Border, and Proportion
A common starting point is a mat border of 2 to 4 inches on a print up to about 11x14, widening to 3 to 5 inches on larger pieces.
If the print has its own printed border or signature, don't cover it with the mat. Cut the opening to the edge of the image area, not the edge of the paper.
Archival vs. Decorative Framing
Archival framing means all materials touching the print are acid-free and lignin-free, the glazing offers UV filtration, and the print is hinged rather than glued, what you want for anything signed, numbered, or likely to gain value.
Decorative framing is everything else: a store-bought frame with acidic cardboard backing and no mat. It's fine for a poster you'll replace.
A simple frame with a properly cut mat does more for the look than an ornate frame without one. Proportion beats ornament almost every time.
When Framing Isn't Worth It
Skip the frame when the print is temporary, a reproduction you plan to rotate, or when the display method itself is the point, a leaning print, a clip-hung poster, or a canvas wrap that arrives ready to hang. Our Hummingbird Canvas Gallery Wraps skip framing entirely with a closed MDF backing and pre-installed hardware.
Shelf, Bookcase, and Layered Displays for a Relaxed Look
Shelf and bookcase displays let you swap prints on a whim, ideal if you refresh a space often. Lean a print against the back of a shelf, layer a smaller piece in front of a larger one, and let the arrangement feel collected rather than staged.
Shelf Depth and Lean Angle
A standard bookcase shelf is 10 to 12 inches deep. A print leaning at a shallow angle needs roughly 1 inch of depth per 6 to 8 inches of height, so a 24-inch print tilted back 10 degrees eats 3 to 4 inches.
A lean that's too vertical tips forward. A lean that's too flat hides the image. Most people land on a 5 to 15 degree tilt, which reads as relaxed without looking like the print is about to slide.
Layering Without Damage
Layering works best with three to five pieces of varying size. Place the largest at the back, angle each piece slightly, and leave breathing room on either side.
Two rules protect the prints:
- Never let a frame or a hard object rest directly on the face of a print. Felt pads or small cork bumpers on the back of the front frame prevent scratches and dents.
- Don't lean a print against a rough surface. Brick, unfinished wood, and textured plaster will scuff the paper edge. A thin strip of felt along the bottom edge of the print solves this.
Mixing materials helps here: a ceramic object, a stack of books, or a small plant next to a leaning print breaks up the flatness of a shelf.
Bookcase and Mantel Specifics
On a bookcase, group by shelf rather than scattering prints across every level.
On a mantel, keep the tallest piece off-center and let the arrangement step down toward the edges.
On a desktop, a single leaning print behind a lamp or a small stack of books is enough. Two is the practical maximum before a desk starts to feel crowded.
The Preservation Trade-Off
Shelf displays expose prints to more dust and ambient light than a framed wall piece. Dust can be wiped off with a soft dry cloth if the print is unframed and the ink fully cured, but on matte or textured paper wiping can burnish the surface, a soft brush is safer.
Rotate shelf pieces every few months so no print sits in the same light path year-round, the same logic as rotating wall art, and it matters more on a shelf because the print is often closer to a window.
For a small desktop or mantel, a Matte Horizontal Poster leaned against the wall behind a few objects reads as intentional and costs nothing to rearrange.

Choosing a Display Method by Budget and Permanence
Pick your method by asking two questions: how long will this stay up, and how much can I spend? Temporary and cheap points to clips or tape. Permanent and protective points to framing or canvas.
| Method | Cost | Permanence | Best For |
|---|---|---|---|
| Poster clips | Low | Temporary | Renters, quick swaps |
| Washi tape | Low | Temporary | Casual, low-stakes prints |
| Leaning | None | Flexible | Shelves, mantels, desktops |
| Framing | Medium | Permanent | Pieces you keep for years |
| Canvas wrap | Medium | Permanent | No-frame, ready to hang |
If you're starting a print collection and want flexibility, buy unframed first and frame the pieces you keep coming back to. Our Dancing Girls Matte Poster and Psychedelic Senor Matte Vertical Posters both come in multiple sizes, so you can build an arrangement around a single piece before committing to frames.

Protecting Your Prints: Light, Humidity, and Rotation
Print preservation comes down to light, humidity, and rotation. UV light fades pigmented inks, so keep prints out of direct sun. Bathrooms and kitchens carry humidity that warps paper and encourages mold behind glass.
Rotate your display every few months. Moving a print spreads light exposure and prevents one area from fading faster than another.
Frequently Asked Questions
What is the 57-inch rule for hanging art?
The 57-inch rule says the center of your artwork should sit 57 inches from the floor, which is the average human eye level. This creates a consistent visual line across a room, even when frames are different sizes. For rooms where people mostly sit, like a dining room or home office, lower the center to around 54 to 56 inches so the art meets your sightline. Always measure from the floor to the center point of the piece, not the top.
How can I display art prints without frames?
You have several frameless options. Poster clips grip the top and bottom edges and hold the print flat against the wall. Washi tape creates a low-damage border on smooth surfaces. Binder clips on a nail or pushpin work for a casual, studio look. Leaning prints on a shelf, bookcase, or the floor gives a relaxed, layered feel. For a polished frameless look, canvas gallery wraps need no frame at all and arrive ready to hang with hardware included.
How do I arrange art prints in a gallery wall?
Start by laying every piece on the floor and arranging them until the grouping feels balanced. A common approach is a grid for same-size prints, a salon-style cluster for mixed sizes, or an organic arrangement that follows a loose shape. Keep 2 to 3 inches between frames so the group reads as one unit. Pick a focal point, usually the largest piece, and build outward. Trace each frame onto paper and tape the templates to the wall before you commit to nail holes.
What is the best way to hang art prints without damaging the wall?
For rentals and delicate surfaces, adhesive strips rated for the weight of your frame are the safest bet. Clean the wall with rubbing alcohol first, press the strip firmly for 30 seconds, and wait an hour before hanging. Poster clips with removable adhesive backs work well for lightweight unframed prints. Command hooks handle most framed pieces under 5 pounds. Avoid adhesive on fresh paint, textured wallpaper, or surfaces near heat, since these weaken the bond and can pull finish off.
How do I keep art prints from fading or curling?
Keep prints out of direct sunlight, since UV exposure fades pigmented inks over time. If a wall gets strong afternoon light, rotate the print to a shadier spot every few months. Humidity causes paper to curl, so avoid hanging prints in bathrooms or above stoves. For unframed prints, store or display them flat rather than rolled. Museum-grade archival paper and pigmented archival inks, like those used in MobiusLDG posters, resist fading better than standard copy paper and dye-based inks.
Building a display you actually love takes more than a hammer and a free afternoon. It takes prints worth showing, and that's where we come in. MobiusLDG offers museum-grade matte posters and ready-to-hang canvas wraps, printed with archival inks on 175gsm paper and available in dozens of sizes. Start with one piece, live with it for a week, and build from there. Subscribe to our emails and we'll send new arrivals and display ideas as they land.